HARD SPOT INSPECTION TROLLEY - English -
Page 56/84
Operating and Maintenance Instructions
adaptaed from: https://app.box.com/s/c6qfgtuhfg1yd2ottrfum98x8jmg7rn3
| Hard spot inspection trolley • PLAMAT-M •
18201 |
|
| Operating and
Maintenance Instructions • V2.0 |
Calibration procedure
|
5 CALIBRATION PROCEDURE
5.1 Introduction
In order to determine material properties like hardness quantitatively,
a calibration must first be performed. Depending on the chemical
composition of the steel and its production process, different
combinations of microstructures and other influencing quantities have
to be distinguished. Independent testing statistics are necessary to
separate microstructure and other influences by suitable conjunction of
these testing statistics.
Generally, the measurement may be affected by different, disturbing
influences such as scale, residual magnetization, residual stress and
other potential parameters. As a direct consequence, an individual
calibration would be required for each influence, steel grade and the
combination thereof. Different microstructures (ferrite, perlite,
bainite, ...), hardening depths and their combination with the
influencing parameter may imply a huge range of different reference
plates, which would have to be provided by the steel manufacturer.
As an alternative approach, a machine learning algorithm for supervised classification is used here.
5.2 Classification methodology
The calibration methodology used here is based on a machine learning
classification algorithm using the Euclidian distance between
nearest-neighbors in parameter space. The pattern of the magnetic
testing statistics of an unknown sample will be compared with all the
pattern of the data in the calibration data base and the nearest
neighbor in relevant parameter space will be investigated. The target
value of the found nearest neighbor will be the resulting target value
for the unknown sample.
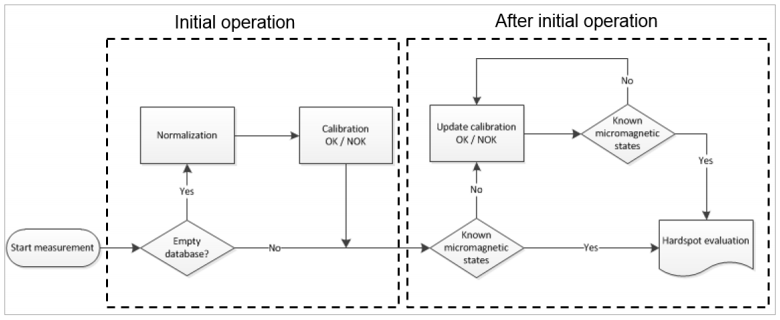
The inspection trolley does not provide absolute hardness. Therefore,
the detection of unknown micro-magnetic states has to be confirmed via
mechanical evaluation with mobile hardness testing (Leeb, UCI) as
absolute reference. The calibration base is successively updated and
extended with new known micro-magnetic states after an initial
operation.

Figure 57: Overview of machine learning procedure
| ROSEN and IZfP Page 56 of
84 |
Confidential! |
|